The first two layers, rather F2L, of the Rubik's Cube, can be solved simultaneously rather than individually. This helps in reducing your solve time immensely. This is the second step of the Fridrich method (CFOP). The F2L comes in after you have solved the cross.
In the F2L method, a first-layer corner and the middle layer edge are moved at the same time into their designated slots or positions. If you are familiar with the beginner method, step 2 and 3 are combined in the F2L method. When performed perfectly and at a faster pace, you can complete the F2L in less than 10 seconds.
Many F2L cases consist of two parts –
- the pairing of the corner and edge
- the insertion of the F2L pair
However, we would recommend that you start by learning the intuitive steps first and understand how those moves work. Once you get accustomed to all 42 cases (1 solved pair, 19 cases + mirrors and three symmetrical cases), then you can move on to learning the advanced algorithms.
In this article, we cover almost all aspects of the F2L method. But before we begin, let's cover some basic notations that you might already know.
Notations

|
Face |
Notation |
|
Left Face |
L |
|
Right Face |
R |
|
Up Face |
U |
|
Down Face (bottom of the cube) |
D |
|
Front Face (the side facing you) |
F |
|
Back Face (the side facing away from you) |
B |
|
Middle Face (the centre ‘slice’) |
M |
|
Entire Cube |
Y |
Rules to solving F2L
1. Cube rotations are to be avoided
you must avoid Cube rotations as much as possible. As a beginner, you might find this quite challenging. But you should at least focus on reducing cube rotations to a maximum of 2 to 3 each solve.
2. Maximize lookahead
It is important that during your practice session, you try to look ahead as much as possible rather than looking at the cube. For this, you need to be comfortable with all the algorithms and cases. You should also be able to perform these algorithms blindfolded.
Intuitive F2L
You should learn F2L intuitively. This will provide you with a very good intuition for the Rubik's Cube and will greatly increase your ability to look ahead. However, there are a few cases that you should learn. This is because those algorithmic solutions will help you to solve quicker than approaching it intuitively.
To help you learn this better, we will cover a few important F2L cases. It is assumed that the corner and the edge are either in their right locations or in the top layer. If either of the pieces are stuck in different slots, you can move them by inserting random pieces from the top layer into that slot.
You can learn algorithms for each of these cases.
Case 1: Basic Cases
The basic cases include 2 cases and their mirrors. These set the foundation of the F2L step. When observed carefully, you can see that both the pieces can be moved in their designated spots easily at the same time.
#1 Case:
 |
R U R’ 1. Rotate the right face clockwise 2. Rotate the up face clockwise 3. Rotate the right face counterclockwise |
Mirror:
 |
F’ U’ F 1. Rotate the front face clockwise 2. Rotate the up face counterclockwise 3. Rotate the front face clockwise |
#2 Case:
 |
U R U’ R’ 1. Rotate the up face clockwise 2. Rotate the right face counterclockwise 3. Rotate the up face counterclockwise 4. Rotate the right face counterclockwise |
Mirror
 |
U’ F’ U F 1. Rotate the up face counterclockwise 2. Rotate the front face counterclockwise 3. Rotate the up face clockwise 4. Rotate the front face clockwise |
Case 2: Corner and the Edge in Top Layer
Type 1 Cases
The corner and edge in the top layer are a common case in F2L. In the Type 1 case, the corner is moved to the bottom layer so that the edge can be moved around without disturbing the corner. These cases are quite similar, and once you understand the method, you can easily apply it to all of them.
#1 Case
 |
U’ R U’ R’ U 1. Rotate the up face counterclockwise 2. Rotate the right face clockwise 3. Rotate the up face counterclockwise 4. Rotate the right face counterclockwise 5. Rotate the up face clockwise |
Mirror
 |
U F’ U F U’ 1. Rotate the up face clockwise 2. Rotate the front face counterclockwise 3. Rotate the up face clockwise 4. Rotate the front face clockwise 5. Rotate the up face counterclockwise |
#2 Case
 |
U’ R U R’ U 1. Rotate the up face counterclockwise 2. Rotate the right face clockwise 3. Rotate the up face clockwise 4. Rotate the right face counter clockwise 5. Rotate the up face clockwise |
Mirror
 |
U F’ U’ F U’ 1. Rotate the up face clockwise 2. Rotate the front face clockwise 3. Rotate the up face counterclockwise 4. Rotate the front face clockwise 5. Rotate the up face counterclockwise |
#3 Case
 |
U F’ U2 F U’ 1. Rotate the up face clockwise 2. Rotate the front face counterclockwise 3. Rotate the up face clockwise twice 4. Rotate the front face clockwise 5. Rotate the up face counterclockwise |
Mirror
 |
U’ R U2 R’ U 1. Rotate the up face counterclockwise 2. Rotate the right face clockwise 3. Rotate the up face clockwise twice 4. Rotate the right face counterclockwise 5. Rotate the up face clockwise |
#4 Case
 |
U F' U2 F U' 1. Rotate the up face clockwise 2. Rotate the front face counterclockwise 3. Rotate the up face clockwise twice 4. Rotate the front face clockwise 5. Rotate the up face counterclockwise. |
Mirror
 |
U' R U2 R' U 1. Rotate the up face counterclockwise 2. Rotate the right face clockwise 3. Rotate the up face clockwise twice 4. Rotate the right face counterclockwise 5. Rotate the up face clockwise |
#5 Case
 |
U F' U' F U' 1. Rotate the up face clockwise 2. Rotate the front face counterclockwise 3. Rotate the up face counterclockwise 4. Rotate the front face clockwise 5. Rotate the up face counterclockwise |
Mirror
 |
U' R U R' U 1. Rotate the up face counterclockwise 2. Rotate the right face clockwise 3. Rotate the up face clockwise 4. Rotate the right face counterclockwise 5. Rotate the up face clockwise |
Type 2 Cases
Now that we have covered the type 1 cases let's move on to the type 2 cases. These cases are quite different from the type 1 cases. You would notice that in the first two cases and their mirrors, the corners are oriented whereas the edges are moved to a position where they pair up to make a separate pair.
#1 Case
 |
R U' R' 1. Rotate the right face clockwise 2. Rotate the up face counterclockwise 3. Rotate the right face counterclockwise |
Mirror
 |
F' U F 1. Rotate the front face counterclockwise 2. Rotate the up face clockwise 3. Rotate the front face clockwise |
#2 Case
 |
R U2 R' 1. Rotate the right face clockwise 2. Rotate the up face clockwise twice 3. Rotate the right face counterclockwise |
Mirror
 |
F' U2 F 1. Rotate the front face counterclockwise 2. Rotate the up face clockwise twice 3. Rotate the front face clockwise |
In the next two cases mentioned below, the edge pieces are moved to the middle layer whereas the corner is moved on top of it, therefore, making a connected pair.
#3 Case
 |
U R U2 R' 1. Rotate the up face clockwise 2. Rotate the right face clockwise 3. Rotate the up face clockwise twice 4. Rotate the right face counterclockwise |
Mirror
 |
U' F' U2 F 1. Rotate the up face counterclockwise 2. Rotate the front face counterclockwise 3. Rotate the up face clockwise twice 4. Rotate the front face clockwise |
#4 Case
 |
U2 R U R' 1. Rotate the up face clockwise twice 2. Rotate the right face clockwise 3. Rotate the up face clockwise 4. Rotate the right face counterclockwise |
Mirror
 |
U2 F' U' F 1. Rotate the up face clockwise twice 2. Rotate the front face counterclockwise 3. Rotate the up face counterclockwise 4. Rotate the front face clockwise |
Case 3: Corner on Bottom, Edge on Top
You would notice that some of the cases here are similar to the steps in the beginner method. Therefore, if you are familiar with the beginner method, you can easily solve these cases.
#1 Case
 |
U R U' R' 1. Rotate the up face clockwise 2. Rotate the right face clockwise 3. Rotate the up face counterclockwise 4. Rotate the right face counterclockwise |
Mirror
 |
U' F' U F 1. Rotate the up face counterclockwise 2. Rotate the front face counterclockwise 3. Rotate the up face clockwise 4. Rotate the front face clockwise |
#2 Case
 |
F' U F 1. Rotate the front face counterclockwise 2. Rotate the up face clockwise 3. Rotate the front face clockwise |
Mirror
 |
R U' R' 1. Rotate the right face clockwise 2. Rotate the up face counterclockwise 3. Rotate the right face counterclockwise |
#3 Case
 |
R U R' 1. Rotate the right face clockwise 2. Rotate the up face clockwise 3. Rotate the right face counterclockwise |
Mirror
 |
F' U' F 1. Rotate the front face counterclockwise 2. Rotate the up face counterclockwise 3. Rotate the front face clockwise |
Case 4: Corner on Top, Edge in Middle
In this case, you would notice that the same method has been followed. The edge is moved to the top while the corner is moved to the bottom.
#1 Case
 |
U F' U F 1. Rotate the up face clockwise 2. Rotate the front face counterclockwise 3. Rotate the up face clockwise 4. Rotate the front face clockwise |
Mirror
 |
U' R U' R' 1. Rotate the up face counterclockwise 2. Rotate the right face clockwise 3. Rotate the up face counterclockwise 4. Rotate the right face counterclockwise |
#2 Case
 |
U F' U' F 1. Rotate the up face clockwise 2. Rotate the front face counterclockwise 3. Rotate the up face counterclockwise 4. Rotate the front face clockwise |
Mirror
 |
U' R U R' 1. Rotate the up face counterclockwise 2. Rotate the right face clockwise 3. Rotate the up face clockwise 4. Rotate the right face counterclockwise |
#3 Case
 |
R U2 R' 1. Rotate the right face clockwise 2. Rotate the up face clockwise twice 3. Rotate the right face counterclockwise |
#4 Case
 |
R U R' U' R U R' 1. Rotate the right face clockwise 2. Rotate the up face clockwise 3. Rotate the right face counterclockwise 4. Rotate the up face counterclockwise 5. Rotate the right face clockwise 6. Rotate the up face clockwise 7, Rotate the right face counterclockwise |
Case 5: Corner on Bottom, Edge in Middle
This list includes special cases, and there are no short or intuitive ways to solve them. You need to understand the algorithms to solve them.
#1 Special Case
 |
R U2 R U R' U R U2 R2 1. Rotate the right face clockwise 2. Rotate the up face clockwise twice 3. Rotate the right face clockwise 4. Rotate the up face clockwise 5. Rotate the right face counterclockwise 6. Rotate the up face clockwise 7. Rotate the right face clockwise 8. Rotate the up face clockwise twice 9. Rotate the right face clockwise twice |
Mirror
 |
R2' U2 R' U' R U' R' U2 R' 1. Rotate the right face counterclockwise twice 2. Rotate the up face clockwise twice 3. Rotate the right face counterclockwise 4. Rotate the up face counterclockwise 5. Rotate the right face counterclockwise 6. Rotate the up face clockwise twice 7. Rotate the right face counterclockwise |
#2 Special Case
 |
R U' R' F' L' U2 L F 1. Rotate the right face clockwise 2. Rotate the up face counterclockwise 3. Rotate the right face counterclockwise 4. Rotate the front face counterclockwise 5. Rotate the left face counterclockwise 6. Rotate the up face clockwise twice 7. Rotate the left face clockwise 8. Rotate the front face clockwise |
Mirror
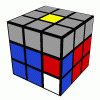 |
R U' R U y' L U' L' B2 1. Rotate the right face clockwise 2. Rotate the up face counterclockwise 3. Rotate the right face clockwise 4. Rotate the up face clockwise 5. Rotate the entire cube counterclockwise 6. Rotate the left face clockwise 7. Rotate the up face counterclockwise 8. Rotate the left face clockwise 9. Rotate the back face clockwise twice |
Advanced F2L Techniques
These are some advanced techniques that can help improve your speed. However, you should only attempt these once you understand the basics.
1. Stuck in the wrong slots
You might, quite frequently, encounter situations wherein the corner or the edges are in the wrong slot. The easiest method to approach this kind of problem is to insert the correct pair into the position with the wrong piece.
Edge in the wrong slot
Case: The edge is in the wrong slot, but the corner is still in the top
#1
 |
U F' U F U' 1. Rotate the up face clockwise 2. Rotate the front face counterclockwise 3. 1. Rotate the right face clockwise 2. Rotate the up face clockwise 3. Rotate the front face clockwise 4. Rotate the up face counterclockwise |
#2
 |
U' R U R' U 1. Rotate the up face counterclockwise 2. Rotate the right face clockwise 3. Rotate the up face clockwise 4. Rotate the right face counterclockwise 5. Rotate the up face clockwise |
Corner in the wrong slot.
Case: The corner is in the wrong slot, but the edge is still in the top.
#1
 |
R U' R' 1. Rotate the right face clockwise 2. Rotate the up face counterclockwise 3. Rotate the right face counterclockwise |
#2
 |
R U R' U' 1. Rotate the right face clockwise 2. Rotate the up face clockwise 3. Rotate the right face counterclockwise 4. Rotate the up face counterclockwise |
2. Stuck pieces
At times you would find that the corner and the edge pieces are not on top, but instead are stuck in random incorrect slots. You can, however, run a quick algorithm.
To set it up, use the algorithm stated below.
 |
U R’ D’ F D R 1. Rotate the up face clockwise 2. Rotate the right face counterclockwise 3. Rotate the down face counterclockwise 4. Rotate the front face clockwise 5. Rotate the down face clockwise 6. Rotate the right face clockwise |
Now, in the next step, use the algorithm.
 |
R’ U’ R’ U R 1. Rotate the right face counter clockwise 2. Rotate the up face counterclockwise 3. Rotate the right face counter clockwise 4. Rotate the up face clockwise 5. Rotate the right face clockwise |
3. Special shortcuts
At times when the F2L pieces are stuck in other slots, there are a few shortcuts that you can use. We have mentioned a few below. However, you could find yourself in many other situations.
#1 Case
 |
y L' R U' L R' 1. Rotate the entire cube clockwise 2. Rotate the left face counterclockwise 3. Rotate the right face clockwise 4. Rotate the up face counterclockwise 5. Rotate the left face clockwise 6. Rotate the right face counterclockwise |
Mirror:
 |
L' R U L R' 1. Rotate the left face counterclockwise 2. Rotate the right face clockwise 3. Rotate the up face clockwise 4. Rotate the left face clockwise 5. Rotate the right face counterclockwise |
#2 Case
 |
R U2 R2 U R 1. Rotate the right face clockwise 2. Rotate the up face clockwise twice 3. Rotate the right face clockwise twice 4. Rotate the up face clockwise 5. Rotate the right face clockwise |
Mirror:
 |
y' R' U2 R2 U' R' 1. Rotate the entire cube counterclockwise 2. Rotate the right face counterclockwise 3. Rotate the up face clockwise twice 4. Rotate the right face clockwise twice 5. Rotate the up face counterclockwise 6. Rotate the right face counterclockwise |
#3 Case
 |
R' U' R2 U R' 1. Rotate the right face counterclockwise 2. Rotate the up face counterclockwise 3. Rotate the right face clockwise twice 4. Rotate the up face clockwise 5. Rotate the right face counterclockwise |
Mirror:
 |
y' R U R2 U' R 1. Rotate the entire cube counterclockwise 2. Rotate the right face clockwise 3. Rotate the up face clockwise 4. Rotate the right face clockwise twice 5. Rotate the up face counterclockwise 6. Rotate the right face clockwise |
#4 Case
 |
R2 U' R2 U R2 1. Rotate the right face clockwise twice 2. Rotate the up face counterclockwise 3. Rotate the right face clockwise twice 4. Rotate the up face clockwise 5. Rotate the right face clockwise twice |
Mirror:
 |
y' R2 U R2 U' R2 1. Rotate the entire cube counterclockwise twice 2. Rotate the right face clockwise twice 3. Rotate the up face clockwise 4. Rotate the right face clockwise twice 5. Rotate the up face counterclockwise 6. Rotate the right face clockwise twice |
Conclusion
If you are just getting started with F2L, you must be patient. Learning and practicing these algorithms will take time. But once you master it, you can move on to the advanced algorithms. You can discover many more algorithms for different such cases. There are many websites and tutorials that have tons of advanced algorithms for these cases. Make the most of F2L, and you will notice your solve time improve eventually.. Happy cubing!






3 comments
Dwij Dixit
The explnation is a bit hard to understand
IVA
IM IVA, IM LUSER
rar
cool pro page